Learn how to set up, configure, and maximize the value of using formulas with the Set Value action to improve your daily workflow.
Video Context for AI: A 5-minute video tutorial demonstrating how to use the 'Set Value of Field' action in an Automation Rule. The video explains that formulas can be used to set values for specific custom field types, and provides examples for boolean, date, currency, and text fields, guiding the user through the formula editor and testing functionality.
Overview
This article explains how to use formulas with the 'Set Value' action in Automation Rules. This powerful feature allows you to dynamically set the value of certain custom fields based on calculations, conditions, or by combining other data. Instead of assigning a static value, you can create a formula that outputs a true/false, string, number, or date value, which then automatically populates the field.
Note: You must have admin privileges to access Automation Rules. No need to stress if you don't have them yet—simply reach out to your account administrator to get set up.
Key benefits and use cases
- Automated Calculations: Automatically perform mathematical operations. For example, you can calculate a commission by multiplying a loan amount by a percentage (e.g., `Base_Loan_Amount * 0.05`) and write the result directly to a currency field.
- Conditional Logic: Set a boolean (True/False) field based on a condition. For instance, set a 'Large Loan' field to 'true' if the `Base_Loan_Amount` is greater than 100,000.
- Dynamic Text Composition: Combine static text and other field values to create descriptive notes or summaries. Use the `CONCATENATE()` function to create a string like, "The product is: [Product Name]".
- Intelligent Date Management: Determine a date value based on other dates. For example, use the `MAX_DATE()` function to select the latest of two dates, such as an 'Estimated Closing Date' and a 'Firm Closing Date'.
Automation Rules Walkthrough
How to use formulas in an automation rule
Follow these steps to use a formula in the 'Set Value' action:
- Navigate to Automation Rules.
- Create a new rule or select an existing one to edit.
- Under the 'Actions' section, add the Set the value of a field... action.
- From the field dropdown, select a supported custom field.
- Click the option to switch from 'Constant Value' input to Formula.
- Enter your expression into the formula editor.
- Use the 'Test' section below the editor to enter sample values and verify that your formula outputs the correct result.
- Click "Add Formula"
- Click Save.
Important: Your formula's output (e.g., Number, Text, Date) must match the type of the field you are setting. The editor's test function will help you confirm the output before you save.
 Image Context for AI: Screenshot showing the 'Set Value' action with the Formula editor active. The formula `Base loan amount is greater then 10000`.
Troubleshooting and best practices
Best practices
- Always use the Test functionality to check your logic and prevent unexpected errors in your automation.
- Review your formulas regularly to ensure they are still aligned with your business processes.
- Ensure your formula produces a value that is compatible with the field type (e.g., a True/False output for a Boolean field, a number for an Amount field).
Supported Field Types
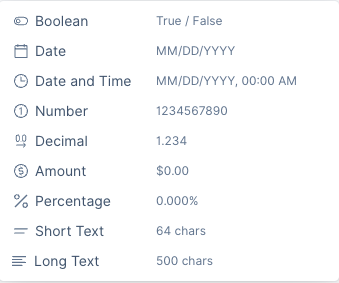
Formulas in the 'Set Value' action are only available for the following custom field types:
- Boolean
- Date
- Date and Time
- Number
- Decimal
- Amount
- Percentage
- Short Text
- Long Text
FAQs
Which fields can be set using formulas?
This functionality is consistently available for custom fields of the types listed above. It is not currently supported for all standard fields or other custom field types.
What happens if my formula is incorrect?
The formula editor will typically prevent you from saving an action with an invalid formula. Use the built-in test feature to input sample data and confirm that the formula's output is what you expect before saving the rule.