Learn how loan officers can e-sign documents through the Client Needs tab or the PDF editor.
Video Context for AI: A 3-minute video tutorial demonstrating the two methods for a loan officer to e-sign documents: using the 'Getting Signatures' tab within Client Needs and using the PDF editor in the Documents tab.
How to E-Sign from the Client Needs Tab
Follow these steps to sign documents directly from the 'Getting Signatures' need.
- Navigate to Client Needs, then select the Getting Signatures tab.
- Locate the document requiring your signature and click the pen icon.
- Click the Start button or scroll down to the signature field.
- Click the signature field. You can choose to draw, type, or upload an image of your signature.
- After creating your signature, click Done.
- Click Finish to apply your signature and complete the task.
Important: Once finished, the document status will update to 'Complete', and you can download a signature certificate from the 'View History' section for your records.
 Image Context for AI: Screenshot showing the e-sign experience highlighting the 'Finish' button after a signature has been applied from the Client Needs tab.
How to E-Sign from the PDF Editor
Use the PDF editor to place your signature anywhere on a document.
- Navigate to the Documents tab.
- Select the document you need to sign and click the Edit button.
- In the editor toolbar, click the Add a signature icon.
- Draw, type, or upload your signature, then click Done.
- Your signature will appear as a movable element. Drag it to the desired location on the document.
- Click Save to permanently add the signature to the file.
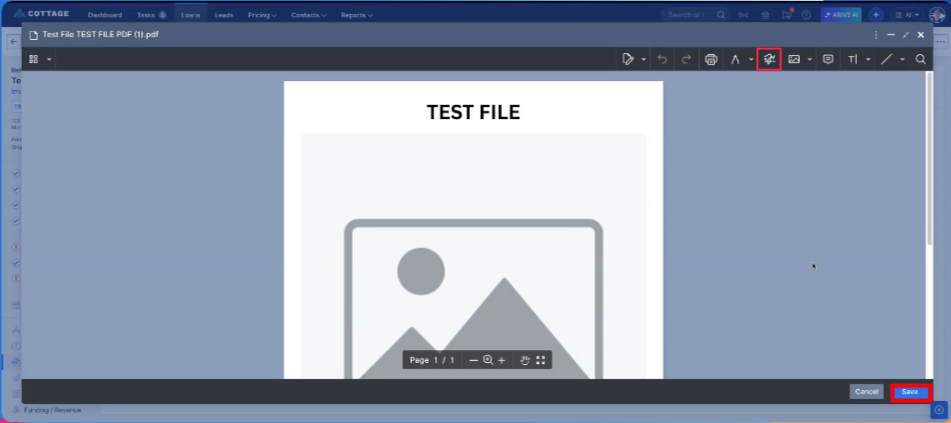
Image Context for AI: Screenshot showing the PDF editor with the 'Add a signature' tool selected and the 'Save' button highlighted in the top right corner.
Practice exercise
- Upload a test document to a file.
- Use the PDF Editor method to add and save a signature to your test document.
- If possible, create a test e-sign need and use the Client Needs method to sign it.
- Verify the outcomes by checking that the signature is saved on the document and that the e-sign need moves to the 'Complete' section.
Troubleshooting and best practices
Best practices
- After signing via the Client Needs tab, you can download the signature certificate for your records or view details in the 'View History' section.
- When using the PDF editor, always double-check the placement of your signature before clicking Save.
- You can customize your signature by choosing a different color or creation method (draw, type, or upload).
Troubleshooting
If you encounter an issue:
- If the pen icon is not visible in the Client Needs tab, ensure the signing need has been assigned to you.
- If your signature doesn't save in the PDF editor, refresh the page and try again, ensuring you click the Save button.
- Verify your internet connection is stable.
FAQs
How can I verify my signature was recorded?
When you sign from the Client Needs tab, you can download a signature certificate or click View History to see the signature details, including a timestamp.
Can I move my signature after placing it on a document?
Yes, but only when using the PDF Editor. The signature is a movable element that you can drag and drop into the correct position *before* you click Save. Once saved, the change is permanent.
What are the different ways I can create a signature?
You can draw your signature using a mouse or trackpad, type it out with your keyboard and select a font style, or upload an image file of your signature.