How to Create and Manage Tasks Automatically
Learn how to use Task Automation to set up, configure, and streamline your daily workflow in ARIVE.
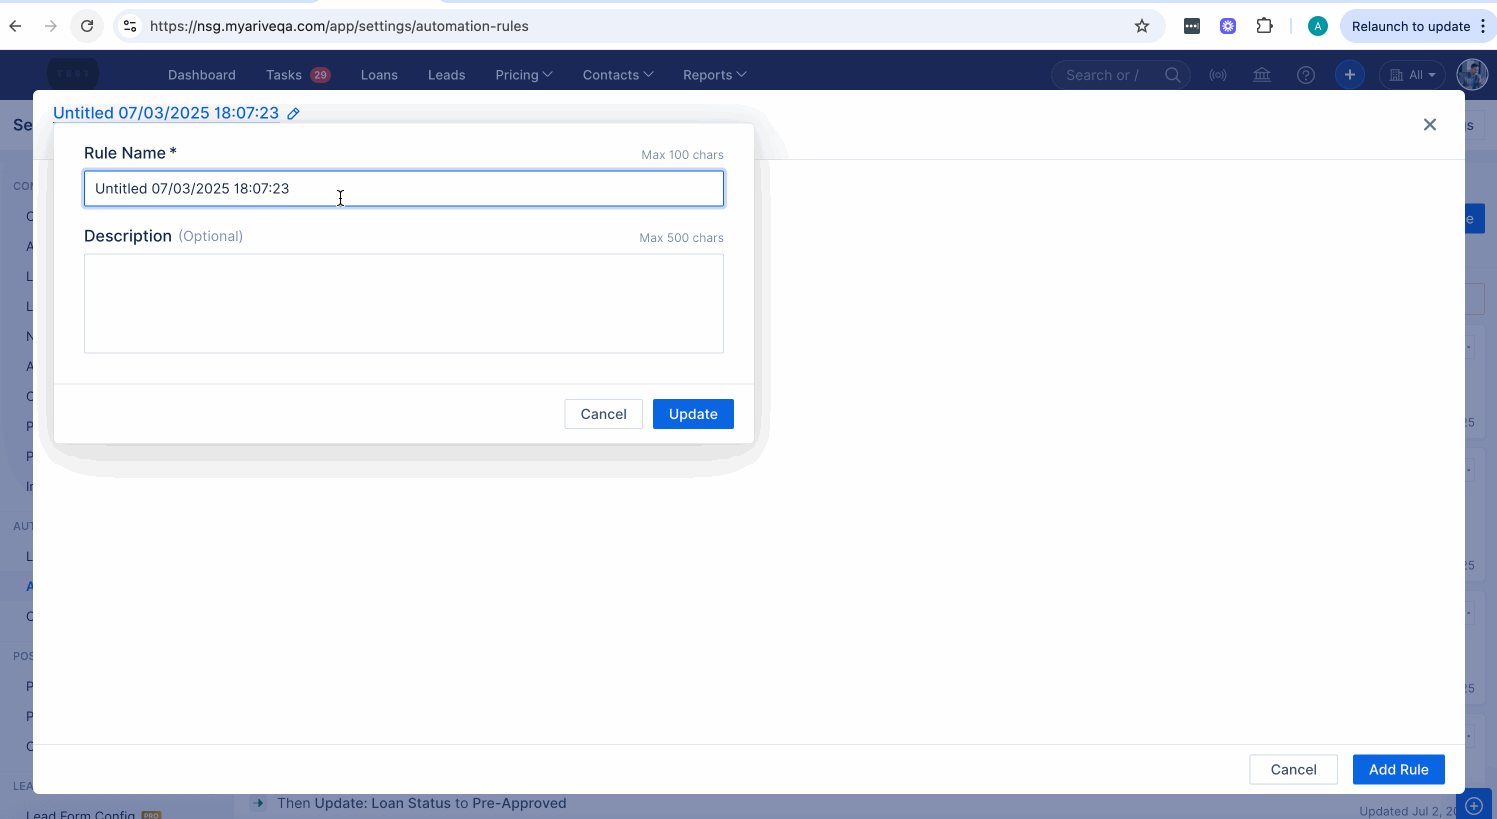
Image Context for AI: Animated screen recording showing a user editing the name and description of an automation rule in the ARIVE platform under Company Settings > Automation Rules. The user updates the default rule name and creates a task template as part of the automation rule setup.
Overview
Task Automation is an extension of Automation Rules, available on the Broker PRO and Non-Del Plans. Tasks in ARIVE organize your workflow by assigning steps to specific users. You can create tasks manually or generate them automatically using templates and automation rules to ensure consistency and save time.
Important Information about Contract Processors and Automation Rules & Tasks:
If you're working with a contract processor, the hiring company (not the processor's company) must configure all automations and task templates under their own company settings.
The hiring company must:
 - Set up task templates
 - Create automation rules
 - Assign the task to the Processor Role
Key Benefits and Use Cases
- Workflow Automation: Automatically generate tasks based on loan milestones or status changes, reducing manual entry and ensuring no step is missed.
- Improved Organization: Assign tasks to specific user roles, with built-in fallbacks, to clarify responsibilities and keep your pipeline moving.
- Enhanced Consistency: Use task templates with required checklists to standardize processes and enforce compliance across all loan files.
Table of Contents
- How to Create a Task Template
- Set Assignee
- Set Due Date
- Add Follow-Up Task
- Add Checklist Items
- Required Checklists and Task Enforcement
- Auto-Complete Tasks
- Add Shortcut Button to Task
- Linking Tasks to Automation Rules
- Task Chaining with the “Task Status Changes” Trigger
- Notifications for Tasks
- Real-Time Communication (RTC)
- Pipeline UI Enhancements
How to Create a Task Template
Follow these steps to create a reusable task template:
- Click on your profile icon in the top right corner of the screen, then click Company Settings.

Image Context for AI: Screenshot of the ARIVE top menu, where the user's profile picture (circle) is located
Select Automation Rules.
 Image Context for AI: Screenshot of the Automation Rules screen with no rules created, highlighting the 'Automation Rules' tab in Company Settings.
- Click on Task Templates.

Image Context for AI: Screenshot of the Automation Rules screen showing an active rule with the ‘Task Templates’ button highlighted.
- Click + Task Template.

Image Context for AI: Screenshot of the Task Templates window showing a list of tasks. The ‘+ Task Template’ button is visible in the top right corner.
- Title your template. Information Tags can be used in the title.
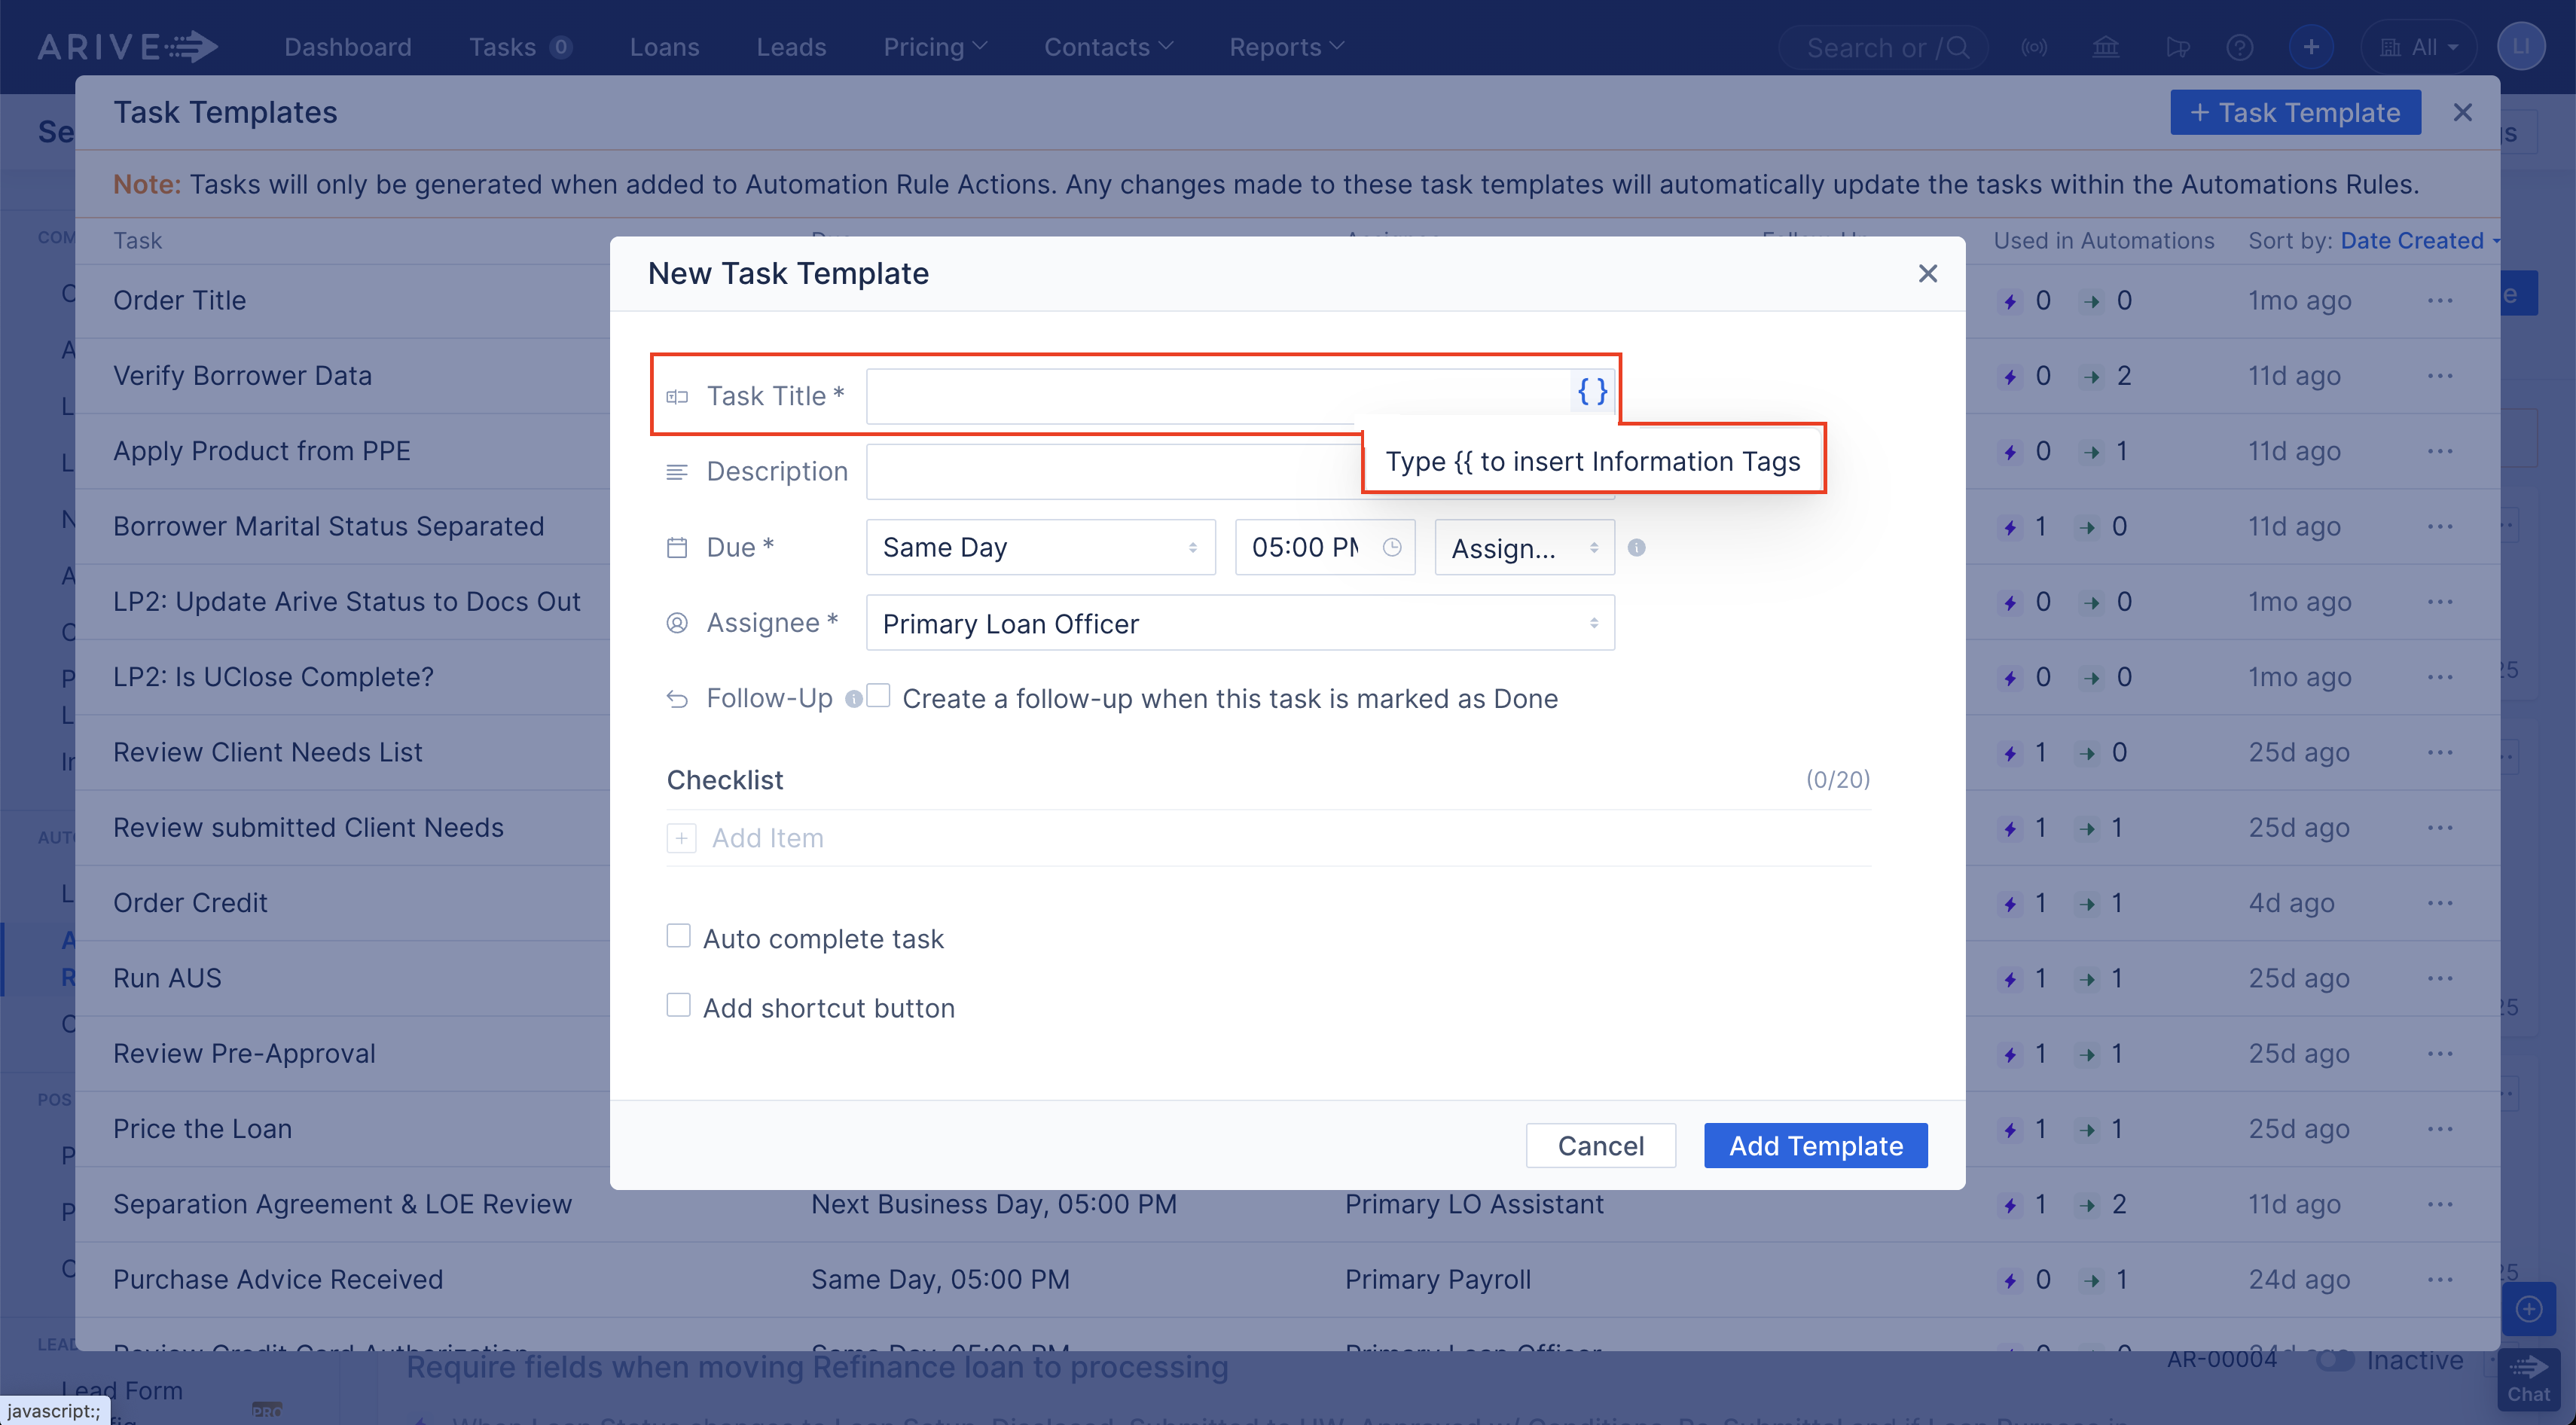
Image Context for AI: Screenshot of the 'New Task Template' form with the 'Task Title' field highlighted. Information about using tags is visible.
- Add a Description. This field supports text formatting and information tags.

Image Context for AI: Screenshot of the 'Description' field in the 'New Task Template' form with the rich text editor toolbar visible.
- Set the task due date, time, and time zone. For more details, see the Set Due Date Section.

Image Context for AI: Screenshot of the New Task Template form with Due Date, Time, and Assignee fields highlighted, including a tooltip about timezone fallback behavior.
- Set the Assignee. Choose the role responsible for the task. For more details, see the Set Assignee Section.

Image Context for AI: Screenshot of the 'Assignee' dropdown in the New Task Template, showing role-based options with fallback assignments listed in parentheses.
- Set up a Follow-Up Task that generates when the current task is marked Done. For more details, see the Add Follow-Up Task Section.

Image Context for AI: Screenshot of the Follow-Up Task section in the New Task Template form, showing the checkbox to enable it, along with due date and assignee dropdowns.
- Add Checklist Items to break the task into smaller steps. For more details, see the Add Checklist Items Section.

Image Context for AI: Screenshot of the New Task Template showing the Checklist section with four sample checklist items and options to add more or make them required.
- Set Auto Complete for Task to automatically mark the task as Done when a specific loan action occurs. For more details, see the Auto-Complete Task Section.

Image Context for AI: Screenshot of the New Task Template screen with the 'Auto Complete' feature enabled, showing a dropdown of trigger actions that can complete the task.
- Add a Shortcut Button to the task that links directly to a relevant section of the loan file. For more details, see the Add Shortcut Button to Task Section.

Image Context for AI: Screenshot of the New Task Template with the “Add Shortcut Button” option enabled, set to navigate to the Loan Center section in the linked loan file.
- Select Add Template.
Set Due Date
Set the task due date, time, and time zone.
- Due Date Options:
- Hours: Next 1 Hour, Next 2 Hours, Next 4 Hours
- Days: Same Day, Next Business Day, In Next 2 Business Day, In Next 3 Business Day
- Week: Next Monday, Next Tuesday, Next Wednesday, Next Thursday, Next Friday, By Next Week
- Time Options: 24 hours in 15-minute increments (e.g., 3:45 PM, 4:00 PM, 4:15 PM, etc.)
- Time Zone Options:The system will pick the Assignee's Timezone if a Company's or Branch's timezone is not selected.
- Assignee TZ: Uses the assignee’s time zone.
- Branch TZ: Uses the branch’s time zone. If not set, it defaults to the assignee’s time zone.
- Company TZ: Uses the company’s time zone. If not set, it defaults to the assignee’s time zone.

Image Context for AI: Screenshot of the New Task Template form with the Due Date, Time, and Assignee fields highlighted, including a tooltip explaining the timezone fallback behavior.
Set Assignee
Choose the role responsible for completing the task. If that user type is unavailable, ARIVE will automatically assign the backup listed in parentheses.
- Assignee Options:
- Primary Loan Officer
- Primary LO Assistant (If unavailable, assign to Primary LO)
- Primary Processor (If unavailable, assign to Primary LO)
- Primary Disclosure Desk (If unavailable, assign to Primary Processor)
- Primary Funder (If unavailable, assign to Primary Processor)
- Primary Payroll (If unavailable, assign to Primary Processor)
- Primary Lock Desk (If unavailable, assign to Primary Processor)
- Primary Closer (If unavailable, assign to Primary Processor)
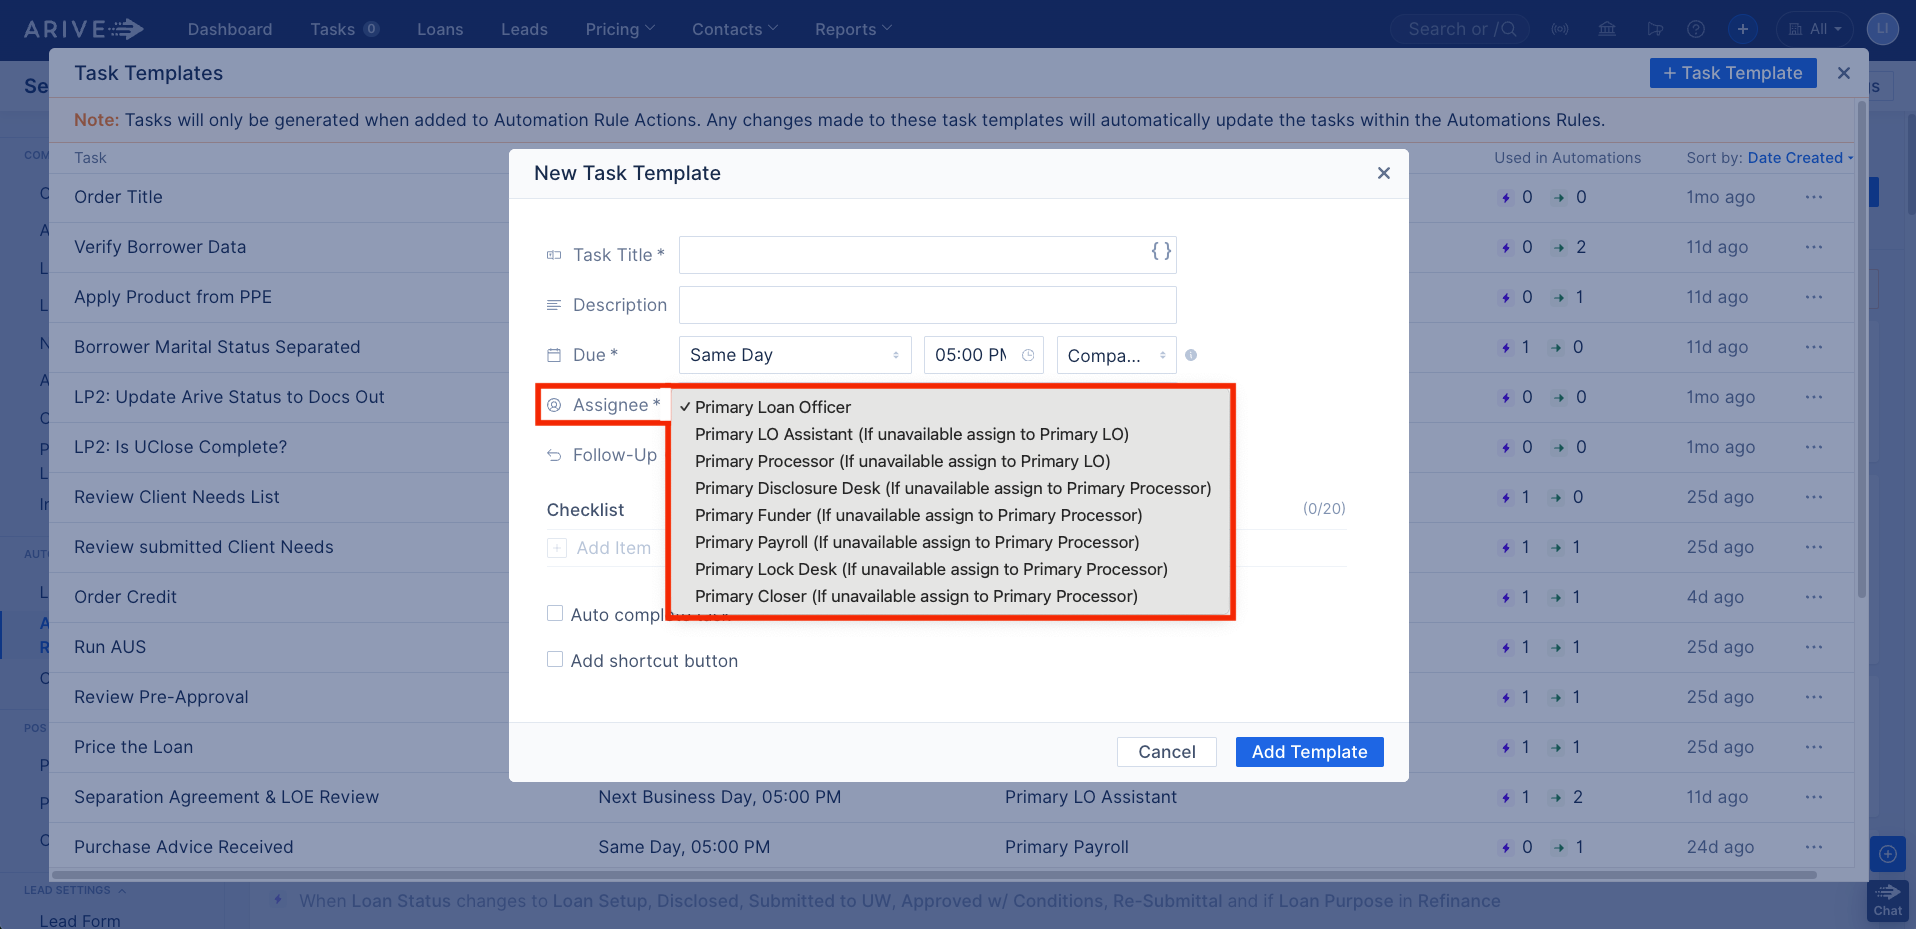
Image Context for AI: Screenshot of the 'Assignee' dropdown menu showing a list of user roles (e.g., Primary Loan Officer, Primary Processor) and their fallback assignments in parentheses.
Add Follow-Up Task
This is not the same as chaining tasks. A Follow-Up task is used when the same task needs additional attention or continued tracking.
- Example: “Request Insurance Binder” could have a follow-up task like “Follow-Up: Request Insurance Binder” assigned for the next day to confirm the request was received.
- Due Options for Follow-Up Task: Same as the main task (Hours, Days, Week options).
- Time Options: 15-minute increments.
- Assign To Options:
- Same Assignee (as the main task)
- All other standard assignee roles.
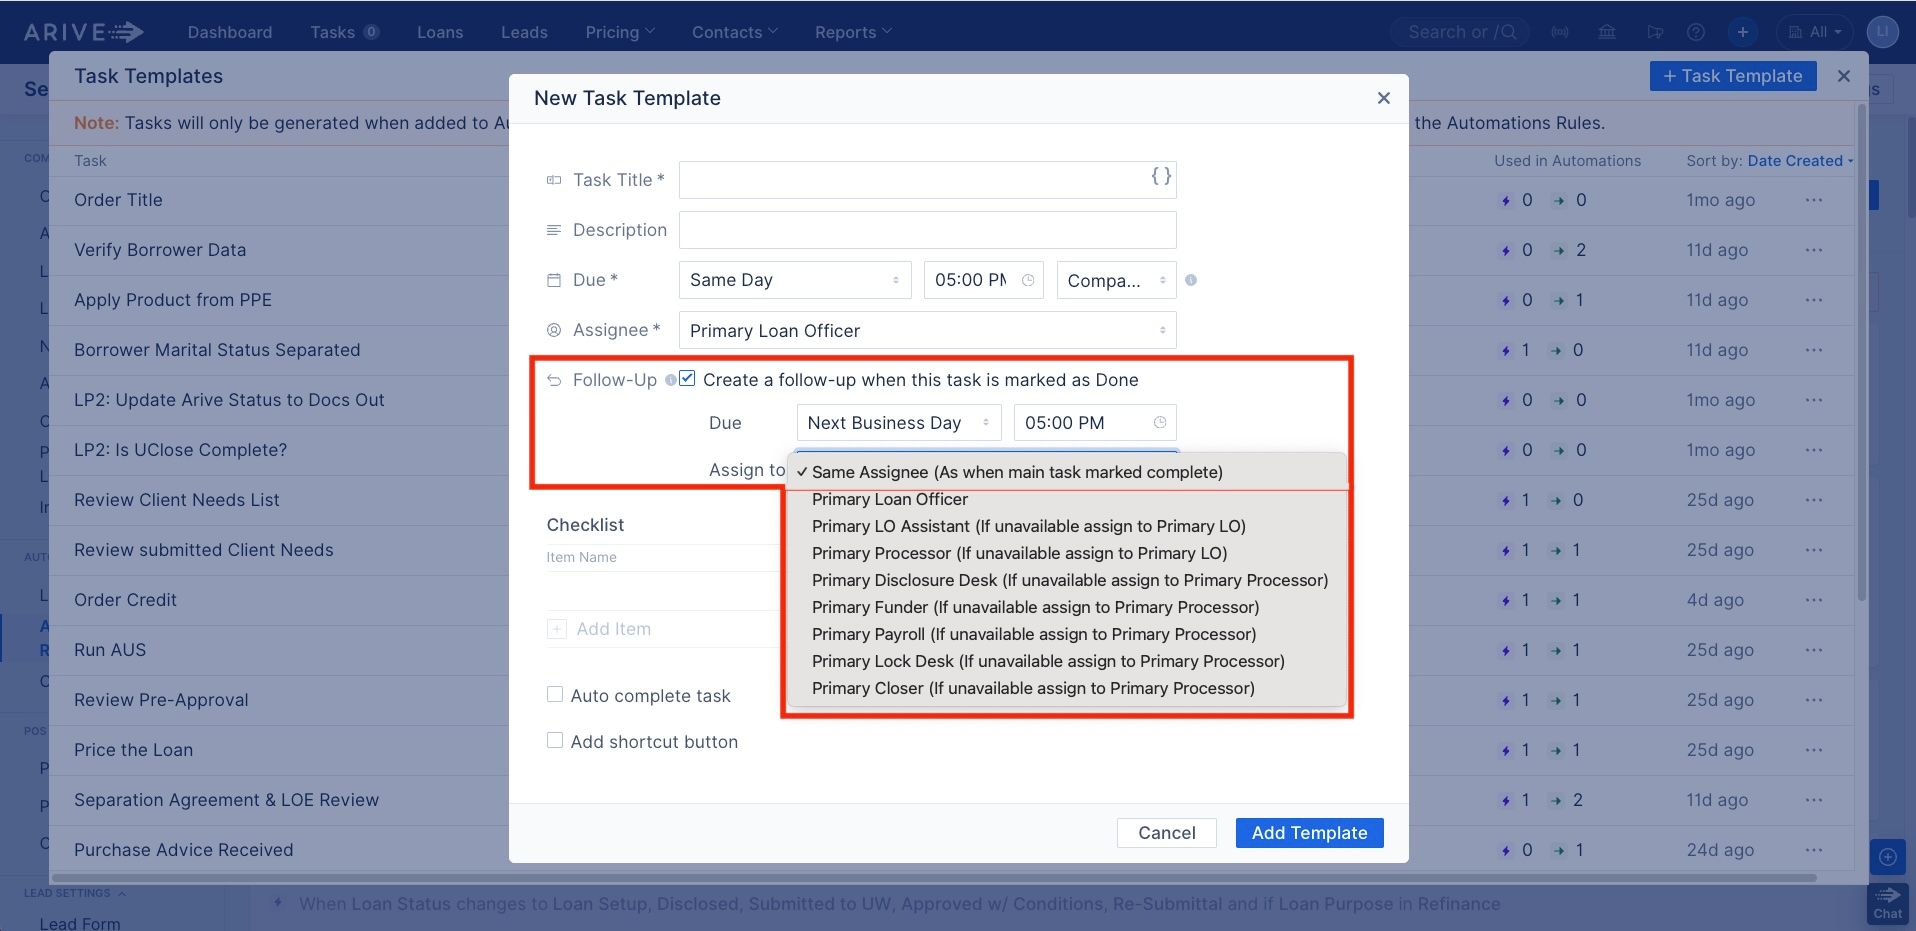
Image Context for AI: Screenshot showing the Follow-Up Task section in the New Task Template form, with options for due date, time, and assignee for the follow-up.
Add Checklist Items
Use checklist items to break the task into smaller, trackable steps for the assigned user. These sub-items can be marked off individually.
- Click + Add Item under the Checklist section.
- Type the item name (e.g., "Confirm Borrower Email").
- Toggle Required to ON if the item must be completed before the task can be marked Done.
- Use Information Tags by typing `{{` to insert borrower or loan-specific fields.
- Add up to 20 checklist items per task.
- Click the Trash Can to delete items.

Image Context for AI: Screenshot of the New Task Template showing the Checklist section with 4 sample checklist items, a follow-up task setup, and the option to insert Information Tags.
Required Checklists and Task Enforcement
To make sure important task checklist items aren’t skipped, you can attach required checklist items to a task. The task cannot be marked complete until all required items are checked.
- Where to set this: In the task template, under the Checklist section, check the box for “Required” next to each item you want to enforce.
Auto-Complete Tasks
You can configure certain tasks to auto-complete when a specific loan action is performed (e.g., the “Order Credit” task completes when a credit report is ordered).
- Edit the task template under Company Settings > Automation Rules > Task Templates.
- Select a template to edit.
- Scroll to the Auto-Complete section.
- Choose an action from the dropdown menu.
- Click Update.
- Available Auto Complete Triggers:
- Apply Product from PPE
- Order Credit
- Register Loan
- Run AUS
- Send Initial Disclosure Package
- Send Loan Estimate
- And many more...
Note: If multiple tasks use the same auto-complete action, they will all complete when that action occurs.

Image Context for AI: Screenshot of the New Task Template screen with the Auto-Complete feature enabled, set to complete when the selected trigger is performed in the loan.
Add Shortcut Button to Task
You can add a shortcut button to a task to link directly to a specific section of the loan file, the Lender Portal, or a custom url, helping the assignee navigate instantly to the right screen.
- Check the Add shortcut button box in the task template.
- Select the destination section from the dropdown menu.
- Shortcut Options: Loan & Property, Borrower Info, Financial Info, Products & Pricing, Loan Center, Documents, and more.
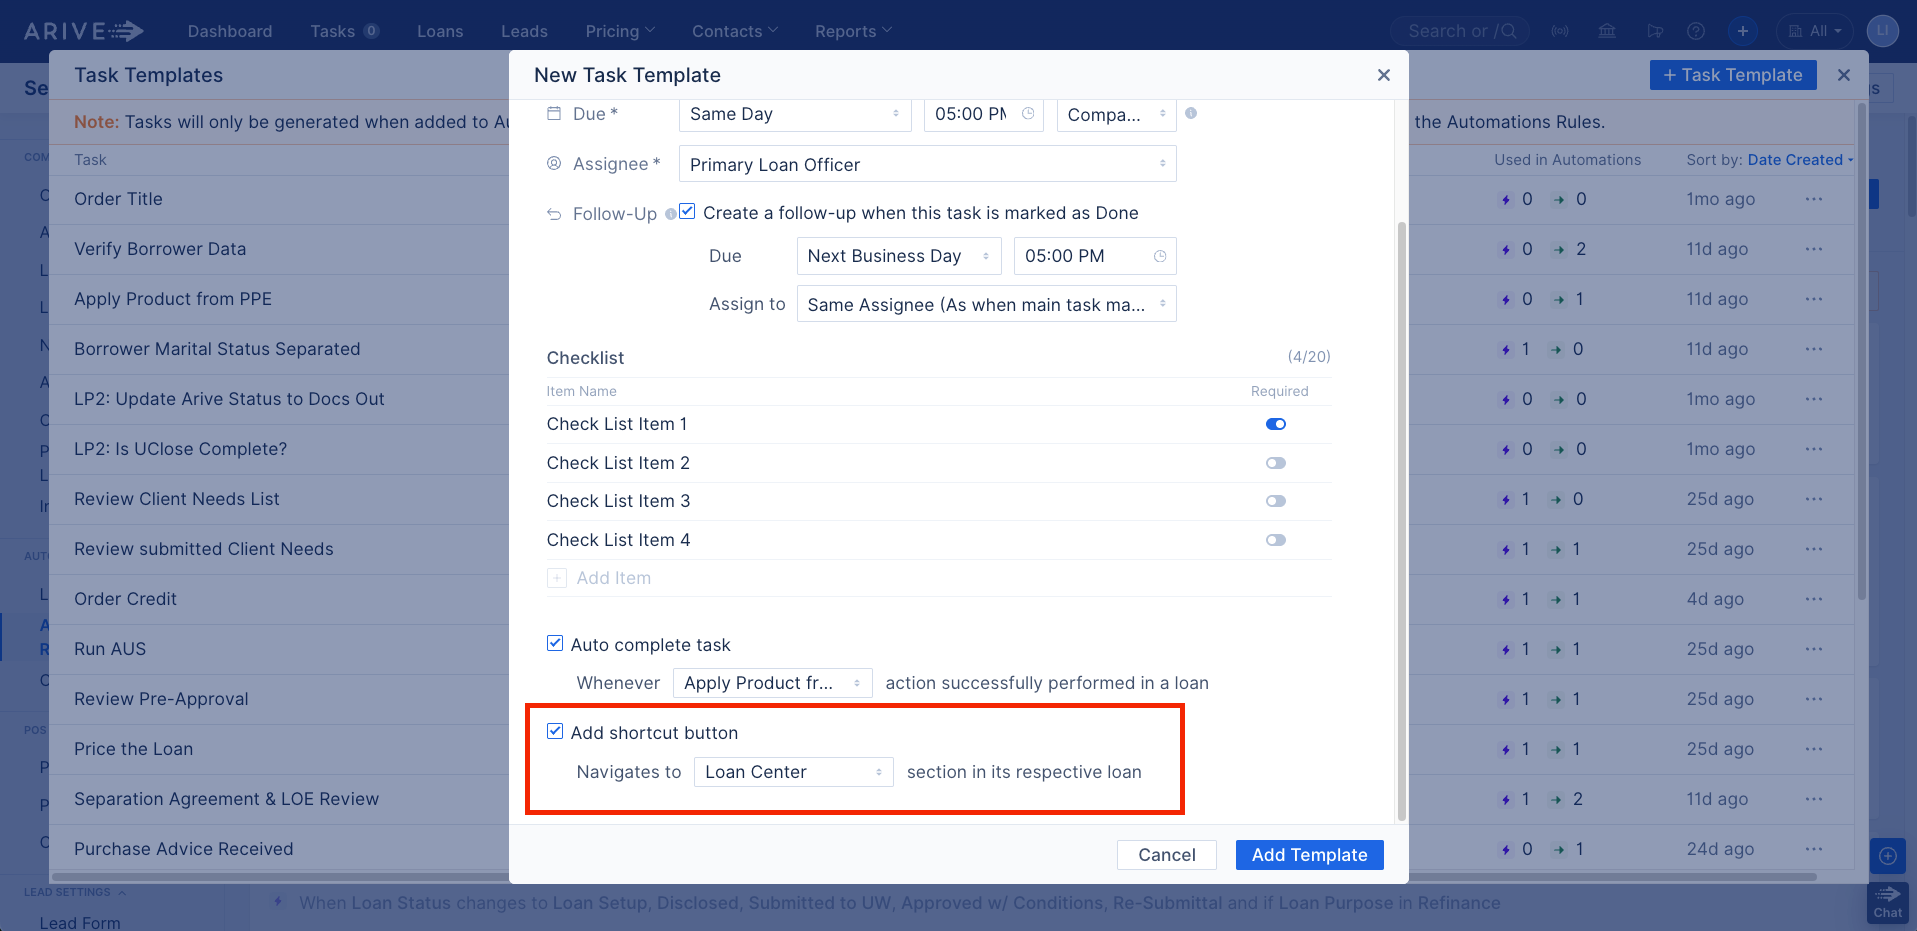
Image Context for AI: Screenshot of the New Task Template with the “Add Shortcut Button” option enabled, set to navigate to the Loan Center section in the linked loan file.
Linking Tasks to Automation Rules
Automate repetitive task creation to save time and ensure consistency.
- Go to Company Settings > Automation Rules.
- Click + New Rule (or edit an existing one).
- Select a Trigger (e.g., Loan Status Changes, Milestone Changes).
- Add Criteria (e.g., Loan Purpose = Purchase), if needed.
- Under Action, select Create Task.
- Choose an existing task template or create a new one.
- Click Add Rule.
Important: The "Task Status Changes" trigger must be selected to use task status as a condition.
Image Context for AI: Screenshot of the Automation Rule editor showing the user adding a title and description to the rule
Task Chaining with the “Task Status Changes” Trigger
Build step-by-step workflows by creating a new task automatically when a previous one is completed. This is done by using the Task Status Changes trigger.
- Example: When Task A (“Order Appraisal”) is marked Complete, automatically trigger Task B (“Confirm Appraisal Payment and Due Date”).
- Create a new Automation Rule and set the Trigger to Task Status Changes.
- For Criteria, set the Task Name to your first task (e.g., "Order Appraisal") and confirm the Status is "is marked as done".
- For the Action, select Create Task and choose the template for your next task (e.g., "Confirm Appraisal Payment...").
- Click Add Rule.
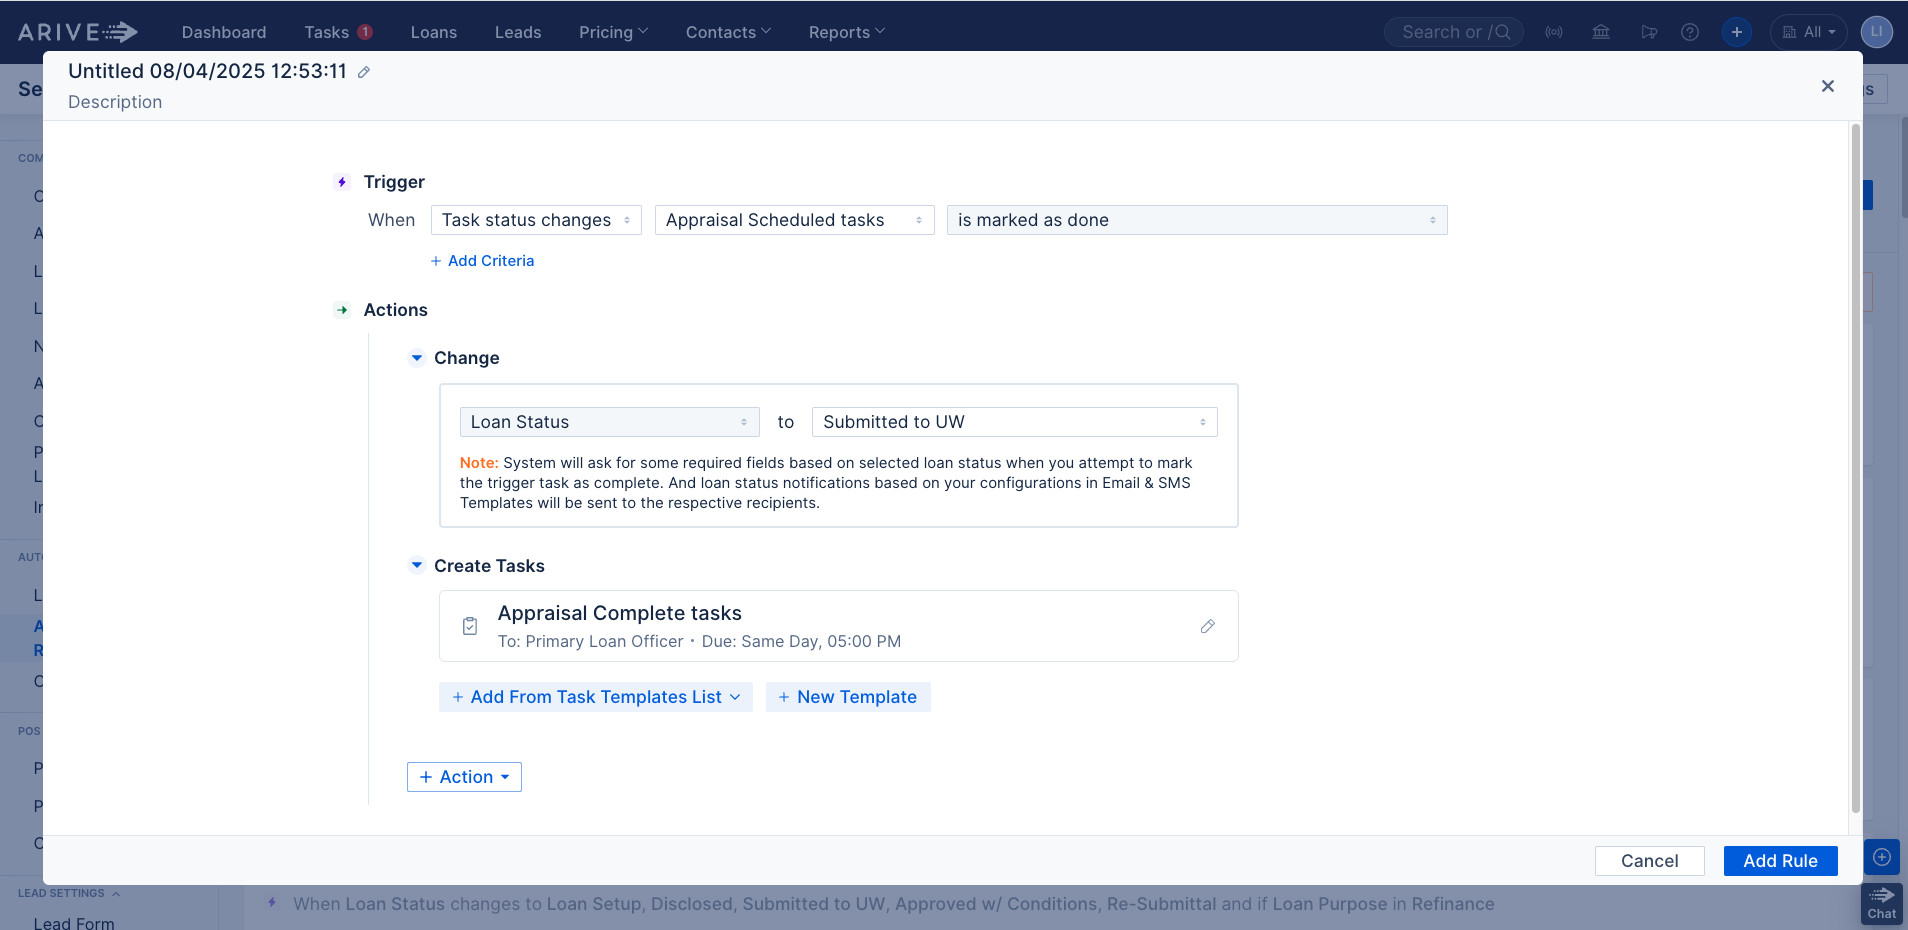
Image Context for AI: Screenshot of an Automation Rule configured for task chaining. The trigger is 'Task Status Changes,' the criteria specifies a task name, and the action is 'Create Task' for the next step.
Notifications for Tasks
Users are notified in real-time and/or via email when a task is reassigned, unassigned, due today, overdue, or upcoming.
- To manage notifications:
- Company-wide: Company Settings > Notifications
- Individual user: User Settings > Notifications
Real-Time Communication (RTC)
Task changes are visible instantly across all open tabs and to all relevant users, including task creation, completion, checklist updates, and assignment changes.
Pipeline UI Enhancements
Tasks are visible directly within your workflow pipelines:
- Loan Pipeline: A "Tasks Due" column shows a summary of outstanding tasks with a hover preview.
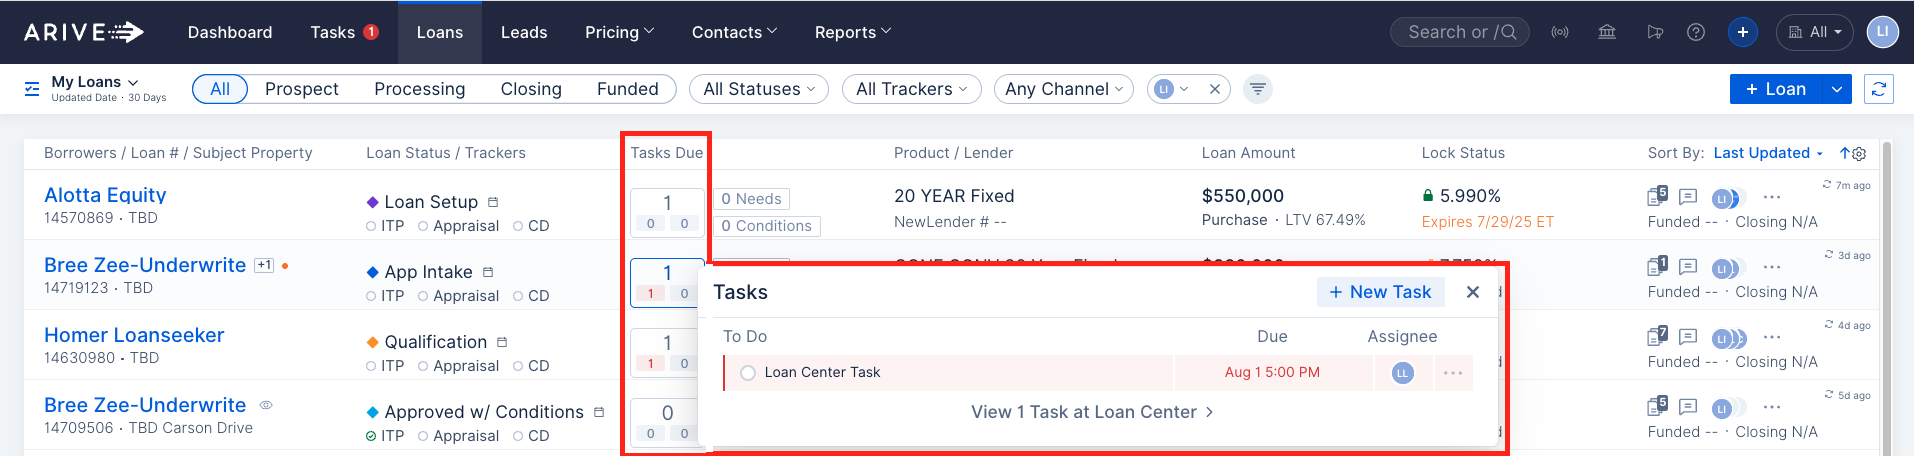
Image Context for AI: Screenshot of the Loan Pipeline view displaying the “Tasks Due” column with a hover preview of a pending task, including its name, due date, and assignee.
- Loan Center: An embedded task view shows all tasks related to that specific loan.

Image Context for AI: Screenshot of the Loan Center view with an embedded task display showing current tasks for the loan.
- Task Pipeline: A dedicated pipeline view for managing all tasks, with filtering, checklist progress, due dates, and assignee info.

Image Context for AI: Screenshot of the Task Pipeline tab showing task filters and a task list with checklist status, due time, loan name, and assignee.
Practice Exercise
To truly master this feature, we recommend trying it out yourself! Follow this quick exercise to build muscle memory.
- Log into your sandbox or test environment.
- Navigate to Company Settings > Automation Rules > Task Templates and create a new template named "Initial Loan Review."
- Add at least two required checklist items, such as "Verify borrower contact info" and "Check credit report for errors."
- Create a new Automation Rule. Set the Trigger to "Loan Status Changes" and the Criteria to when the status becomes "Loan Setup."
- Set the Action to "Create Task" and select your "Initial Loan Review" template.
- Finally, change a test loan's status to "Loan Setup" and verify that the new task appears correctly in the Loan Center.
Pro tip: Practicing on a test file ensures you can safely explore all options without affecting live customer data.
Troubleshooting and Best Practices
Best Practices
- Use Test files: Always build and test new automation rules on a test file before deploying them to your Branch or Org.
- Clear Naming Conventions: Use descriptive names for your task templates and rules (e.g., "Purchase - Appraisal Ordered Task") to easily identify them later.
- Leverage Task Chaining: For multi-step processes, use the "Task Status Changes" trigger to chain tasks together. This keeps your workflow clean and ensures steps are followed in order.
- Processor Collaboration: Remember, if you work with a contract processor, the hiring company must configure all automations and assign tasks to the "Processor" role from their own settings.
Troubleshooting
If you encounter an issue, check the following:
- My automation rule didn't fire: Double-check that the trigger and all criteria in the automation rule exactly match the action you performed on the loan. A small mismatch in status names or other conditions will prevent it from running.
- A task was assigned to the wrong person: Review the "Assignee" settings in your Task Template. Remember that ARIVE uses a fallback system (e.g., if Primary Processor isn't available, it may go to the Primary LO).
- I can't mark a task as "Done": Check if the task has any "Required" checklist items. All required items must be checked off before the task can be completed.
FAQs
What is the difference between a "Follow-Up Task" and "Task Chaining"?
A Follow-Up Task is for reminding someone to check on the same task (e.g., "Follow up on appraisal order"). Task Chaining is for creating the next, different task in a sequence after the previous one is completed (e.g., after "Order Appraisal" is done, a new task "Review Appraisal Report" is created).
Can a single action, like sending a disclosure, complete more than one task?
Yes. If multiple tasks are set to auto-complete based on the same trigger (e.g., "Send Initial Disclosure Package"), all of them will be marked as complete when that action occurs. Be mindful of this when designing your workflow.
How do I manage task notifications?
Task notifications can be managed at a company-wide level under Company Settings > Notifications or by individual users in their own User Settings > Notifications.
See Also:
Automation Rules Configuration
Task Management Release Notes
Task Pipeline